This is the online copy of the guide that ships with Auctionyx (documentation/index.html in your download). Product page · Pricing · Live demo
Auctionyx
A Next.js auction website template: timed auctions, live bidding with proxy bids, bidder accounts and a full admin dashboard. This guide takes you from unzipping the download to a live site, one step at a time.
Install Node.js 20 or newer, open a terminal in the template folder and run pnpm install, then pnpm dev. Open http://localhost:3000. You don't need a database or any settings for this. The site runs on built-in demo data.
01 Introduction & features
Thank you for buying Auctionyx! You get a finished, modern auction website that you can rebrand and fill with your own auctions.
Auctionyx is a complete auction website built with Next.js. This full-stack edition includes both parts: the website (auctions, bidding, accounts, admin) and the backend that stores everything in a PostgreSQL database, runs the bidding rules, closes sales on time, sends e-mails and takes card payments.
It runs in two ways:
- Demo mode (no setup): straight after installing, the site runs on built-in demo data from JSON files, with realistic auctions, bidders and bids. Nothing is saved.
- Real mode: give it a PostgreSQL database (one setting,
DATABASE_URL) and it becomes your real auction site. Section 9 walks you through it.
You do not need to build or buy a separate backend. You only need a PostgreSQL database (free plans exist, for example Neon or Supabase) and a host that runs Node.js. Developers can still connect their own backend instead (section 9.7).
Features
Auctions & lots
Auction events that hold many lots, plus standalone lots. Live, upcoming and ended tabs. Featured events and lots.
Live bidding
The price, bid count, countdown and bid history on the lot page refresh on their own. Visitors see "You're leading" or "You've been outbid".
Proxy (maximum) bids
A bidder can set a secret maximum. The system then bids for them, one step at a time, up to that limit.
Fair closing
Minimum bid steps, hidden reserve prices and anti-sniping, which adds extra time when someone bids in the final moments.
Catalogue
Keyword search, category, status and sort filters, and pagination. Every filtered view has its own shareable link.
Bidder accounts
Register, sign in, verify e-mail, reset password, two-factor login, dashboard, my bids, watchlist, notifications and invoices.
Admin dashboard
Manage events, lots, galleries, bidders, users, invoices, enquiries and consignments. Includes an audit log, reports with CSV export, and site settings.
Buyer tools
Lot enquiries (questions, condition reports, absentee and telephone bids), a "Sell with us" valuation form, a contact form and newsletter sign-up.
Invoices
One invoice for each won lot: hammer price plus buyer's premium plus tax, calculated without rounding errors.
Look & feel
Blue-to-purple brand gradient, Sora and Inter fonts (stored in the template), and a light / dark / system theme switch.
Currencies
Each auction sells in its own currency. Visitors can see a rough price in USD, GBP, EUR, CHF, AED or HKD.
SEO & accessibility
Page titles, descriptions, Open Graph tags, a sitemap, robots.txt and structured data for lots. Skip link, keyboard-friendly forms and a cookie-consent banner.
02 What's included
After you unzip the download you get the full source code. These are the folders you will use most:
auctionyx-nextjs-template/
├── documentation/          ← this guide (open index.html)
├── docs/                   ← extra guides, including docs/developer/ for developers
├── public/
│   ├── brand/              ← logos and favicons
│   ├── fonts/              ← Sora and Inter font files
│   └── images/             ← hero, category, event and lot photos (+ CREDITS.md)
├── src/
│   ├── app/                ← the pages (one folder per web address)
│   │   └── globals.css     ← colours, fonts, dark mode
│   ├── components/         ← reusable building blocks (header, footer, cards…)
│   ├── backend/            ← the built-in backend (database, bidding, e-mail, payments)
│   ├── engine/             ← the auction rules (proxy bids, closing, invoices)
│   ├── mock-api/
│   │   └── data/           ← ALL demo content, as JSON files
│   ├── api/                ← how the site talks to the API (for developers)
│   ├── services/ actions/  ← data loading and form handling (for developers)
│   └── lib/                ← helpers: money, dates, currency
├── drizzle/                ← database migrations (the table definitions)
├── docker-compose.yml      ← an optional local PostgreSQL for testing
├── .env.example            ← list of settings; copy it to .env.local
├── package.json            ← scripts: dev, build, start…
└── LICENSE.md
The demo data files
All demo content is stored in src/mock-api/data/. These files are used in demo mode only — on your real site, the same content lives in the database and you edit it in the admin area.
| File | What it holds |
|---|---|
settings.json | Site name, tagline, contact details, social links, bidding rules, notification and tax settings. |
site.json | Header, footer and legal menus. The currencies in the currency switcher and their exchange rates. |
home.json | All homepage text: hero, section titles, categories, "how it works", stats, testimonials, call-to-action. |
pages.json | Legal pages, plus the intro text of the Sell and Contact pages. |
events.json | Auction events (sales). |
lots.json | The items for sale. |
lot-images.json | Gallery pictures for each lot. |
bids.json | Demo bids already placed. |
users.json | Demo accounts (admin and bidders). |
watchlist.json, notifications.json, invoices.json, enquiries.json, consignments.json, audit-log.json | Demo records for the account and admin screens. |
meta.json | The "anchor" date the demo dates are written against (see dates). |
03 Requirements
| What | Version | Notes |
|---|---|---|
| Node.js | 20 or newer | The "LTS" version from nodejs.org is the safest choice. |
| pnpm | 9 (the project asks for 9.12.0) | The package manager. Node's built-in corepack can install it for you (see below). |
| A code editor | any | For example Visual Studio Code. You will edit JSON and CSS files. |
| A modern browser | any current | Chrome, Edge, Firefox or Safari. |
| Database | PostgreSQL 14 or newer | Only for your real site — not needed to try the demo. A free managed database (Neon, Supabase, Railway) is the easiest start. |
| E-mail sending | any SMTP server or Resend | For your real site: sign-up confirmations, password resets, "you won" e-mails. |
Basic comfort with a terminal (typing a command and pressing Enter) is all you need. Every command is given in full below.
04 Installation
- Unzip the download and put the
auctionyx-nextjs-templatefolder somewhere easy to find, such as your Documents folder. - Install Node.js 20+. Then check that it works:
It should printnode -vv20.xor higher. - Turn on pnpm (once per computer):
If that fails, install pnpm with npm instead:corepack enablenpm install -g pnpm. - Open a terminal in the template folder. In VS Code: File → Open Folder, then Terminal → New Terminal.
- Install the dependencies (takes a minute the first time):
pnpm install - Start the site:
pnpm dev - Open http://localhost:3000 in your browser. You should see the homepage with live demo auctions. To stop the site, go back to the terminal and press Ctrl+C.
Every setting is optional. To change one, copy .env.example to a new file named .env.local and edit it. Restart pnpm dev after any change. All settings are listed in section 11.
When the site is running, the terminal shows something like this (your version numbers and network address will differ):
   ▲ Next.js 15.5.26
   - Local:        http://localhost:3000

 ✓ Starting...
 ✓ Ready in 2.8s
Windows notes
- Install Node.js with the Windows installer (
.msi) from nodejs.org. Keep the default options. - Use PowerShell or the VS Code terminal. Run
corepack enablein a terminal opened with Run as administrator if you see a permission error. - If PowerShell says "running scripts is disabled on this system" when you type
pnpm, run this once, then open a new terminal:Set-ExecutionPolicy -Scope CurrentUser RemoteSigned - To copy the settings file:
Copy-Item .env.example .env.local(PowerShell) orcopy .env.example .env.local(Command Prompt). - Keep the project in a short path without special characters (for example
C:\sites\auctionyx). Very long paths can make installs fail.
macOS notes
- Install Node.js with the macOS installer from nodejs.org, or with Homebrew:
brew install node@20. - Open Terminal, type
cd(with a space), drag the template folder into the window and press Enter. This moves you into the folder. - If
corepack enablesays "permission denied", runsudo corepack enableand enter your Mac password. - To copy the settings file:
cp .env.example .env.local. Files that start with a dot are hidden in Finder. Press Cmd+Shift+. to show them.
Production build
pnpm dev is for working on the site. It is slower and shows developer messages. To run the optimised version, use:
pnpm build
pnpm start:demo
pnpm start:demo serves the optimised site with the demo data. Once your database is set up (section 9), use pnpm start instead. Plain pnpm start refuses to show the demo data on purpose, so a live site can never go out with the public demo logins (visitors would see a "We'll be right back" page, and the terminal explains why).
Other useful commands in package.json: pnpm lint (code check), pnpm typecheck (TypeScript check), pnpm test (unit tests).
05 Demo accounts
These accounts only exist in the built-in demo data (src/mock-api/data/users.json). Sign in at /login.
| Role | Password | After sign-in you land on | |
|---|---|---|---|
| Admin | admin@demo.test | demo1234 | The admin dashboard, /admin |
| Bidder | bidder@demo.test | demo1234 | The bidder dashboard, /account |
The demo data also has eight more bidders (all with password demo1234). Among them are hana.sato@demo.test, who is pending approval, and victor.hale@demo.test, who is suspended. Use them to test the bidder-approval tools.
In demo mode, bids, sign-ups and admin changes are kept in memory. They are lost when the server restarts. A strip at the top of the site tells visitors this. It disappears when a real backend is connected. Demo passwords are stored as plain text so they are easy to try. A real backend must never do that.
06 Quick tour of the site
As a visitor (not signed in)
| Page | Address | What it does |
|---|---|---|
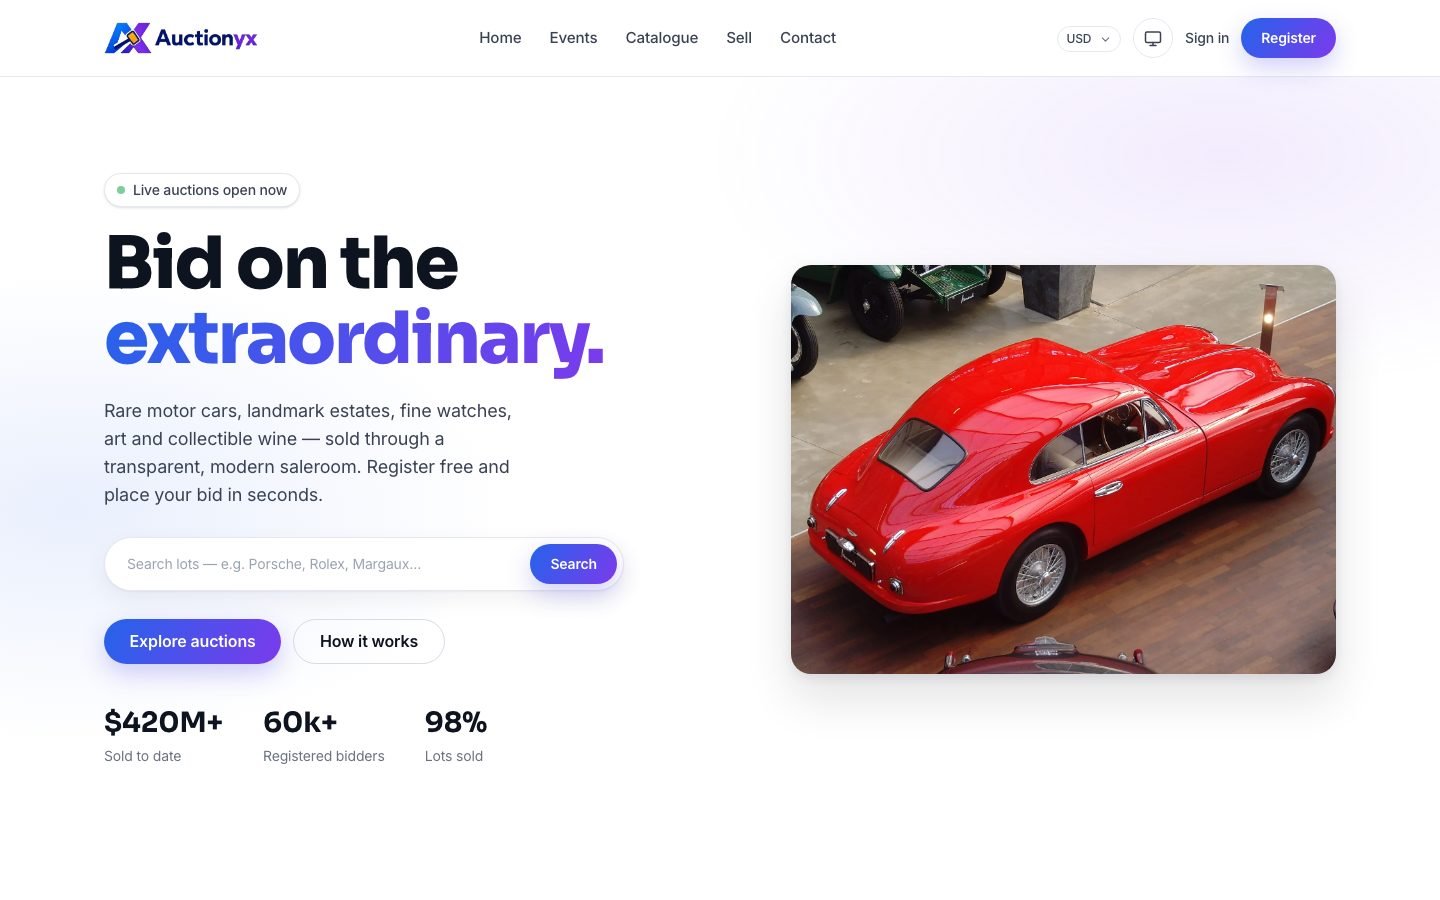
| Home | / | Hero with search box, live & upcoming auctions, categories, "how it works", featured lots, trust stats, testimonials and a call-to-action banner. |
| Auctions | /events | All public sales, with Live, Upcoming and Ended tabs and pagination. |
| Auction page | /events/<slug> | Banner, description, opening and closing time, buyer's premium, lot count and all the sale's lots. |
| Catalogue | /auctions | Every lot. Search by keyword, filter by category and status (live / upcoming / ended), sort (newest, ending soonest, price high/low). 24 lots per page. |
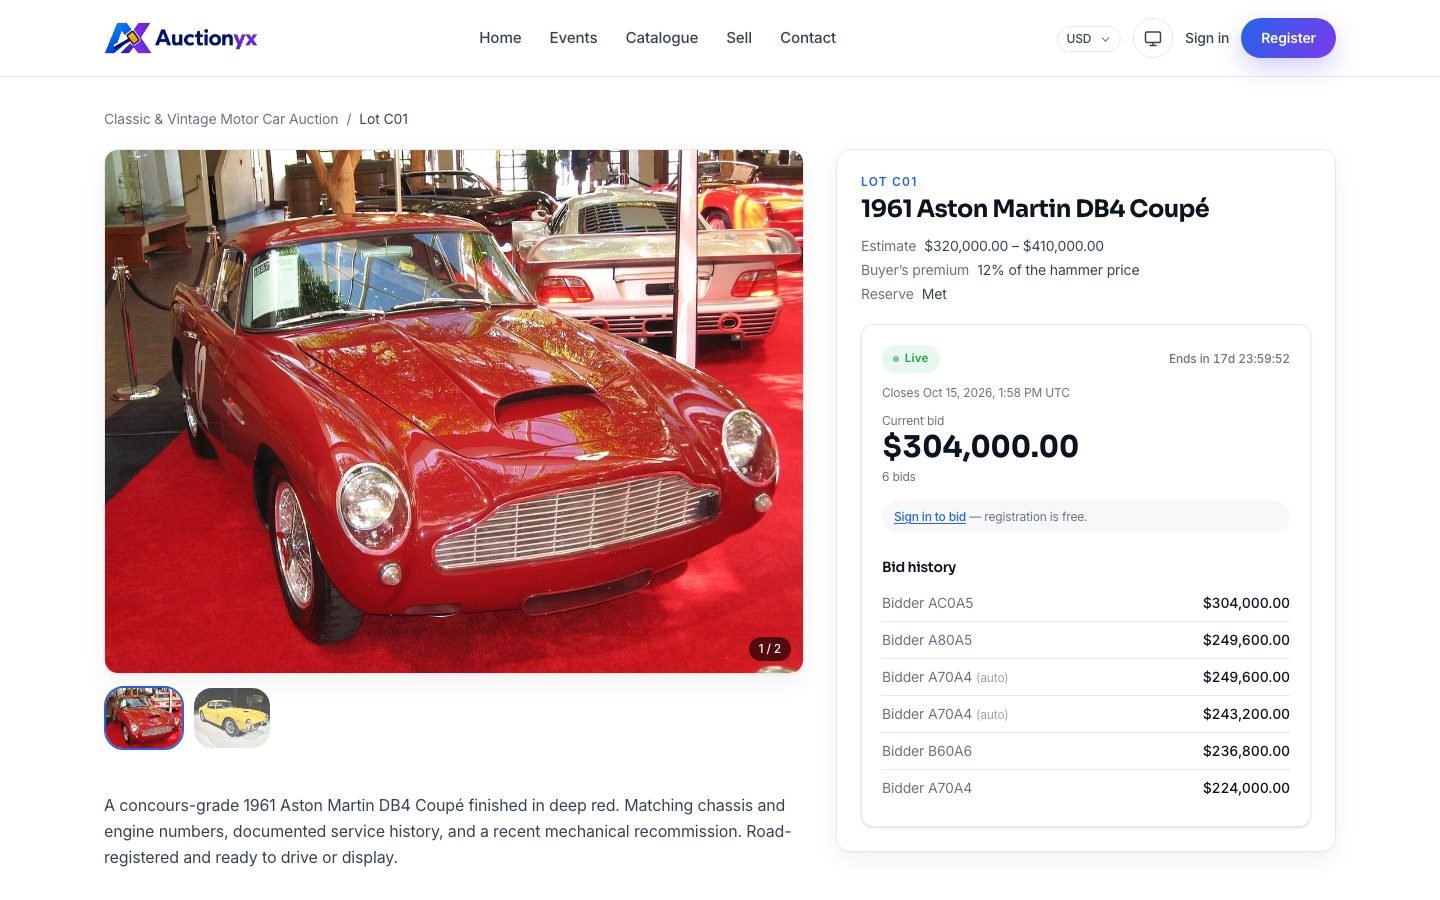
| Lot page | /auctions/<slug> | Photo gallery, description, provenance, condition report, shipping note, estimate, buyer's premium, reserve status, rough price in the visitor's chosen currency, the live bidding panel and the enquiry form. |
| Sell with us | /sell | Intro text and a valuation (consignment) request form. |
| Contact | /contact | E-mail, phone and address from the settings, and a general enquiry form. |
| Legal pages | /legal/<slug> | Conditions of Sale, Privacy, Cookies, Shipping & Collection. |
| Sign in / Register | /login, /register | Plus /forgot-password, /reset-password and /verify-email. |
The header has the main menu, a currency switcher (for rough prices only; bids are always in the lot's own currency) and a theme switch (System → Light → Dark). The footer has the site blurb, social links, menu columns, a newsletter form and the legal links. On a first visit, a cookie-consent banner appears.
As a bidder
Sign in as bidder@demo.test, open any live lot and try it:
- Place a bid. The panel shows the lowest bid you can place now. Enter an amount and submit.
- Set a maximum (proxy bid). Open "Set a maximum (proxy bid)" and enter the most you will pay. The system bids for you as others bid (see section 8).
- Watch a lot to follow it on your watchlist and get notifications about it.
- Enquire: ask a question, request a condition report, or leave an absentee or telephone bid.
Your account area at /account:
| Screen | Address | What you see |
|---|---|---|
| Dashboard | /account | Counters for active bids, leading, outbid, won and watching, plus your recent bids. |
| My bids | /account/bids | Your lots grouped as Leading, Outbid, Won and Closed. |
| Watchlist | /account/watchlist | Lots you watch. Remove any with one click. |
| Notifications | /account/notifications | Outbid, won, new bid on a watched lot, and "ending soon" messages. The unread count shows in the menu. |
| Invoices | /account/invoices | One invoice for each won lot, with hammer price, buyer's premium, tax and total, and a Pay button for unpaid invoices. |
| Security | /account/security | Change display name and password, verify your e-mail, and turn two-factor authentication (2FA) on or off with an authenticator app. |
No e-mails are sent. The verify-e-mail and password-reset links are printed in the terminal where pnpm dev runs. Look for a line starting with [mock-api]. The Pay button marks the invoice paid straight away. With a real backend, it sends the buyer to your payment provider instead.
As an admin
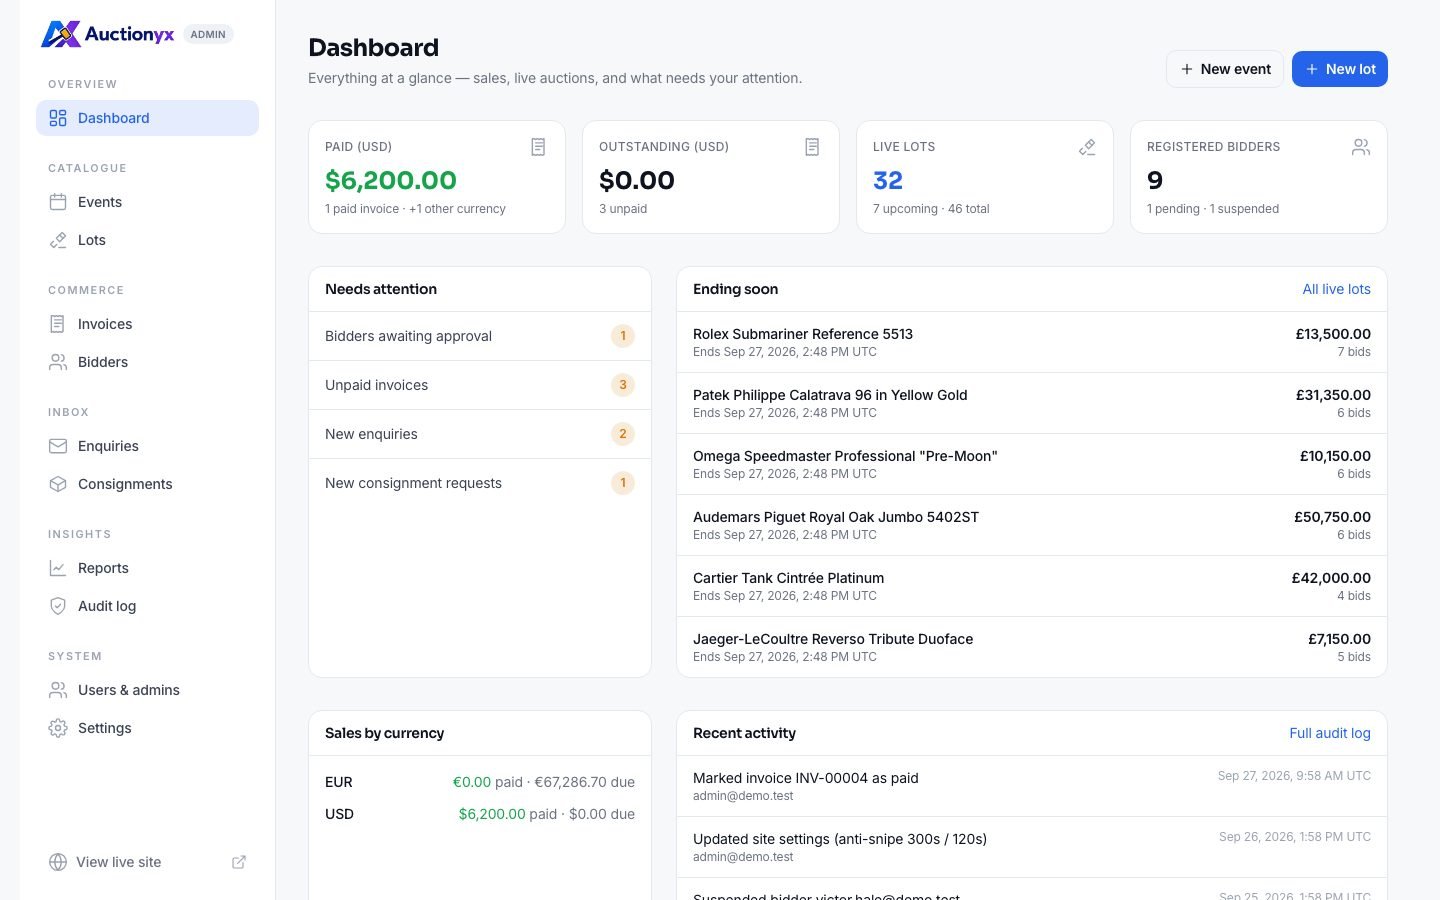
Sign in as admin@demo.test. The admin area at /admin has its own sidebar (a drawer menu on phones). Only admin accounts can open it. Everyone else is sent to their account or to sign-in.
| Screen | Address | What you can do |
|---|---|---|
| Dashboard | /admin | Paid and outstanding totals, live lots, registered bidders, a "needs attention" list (pending bidders, unpaid invoices, new enquiries, new consignments), lots ending soon, sales by currency, recent activity and quick links. |
| Events | /admin/events | Search and filter by status. Create and edit events. Move an event through its lifecycle (schedule, open, pause, end, cancel). Delete when allowed. |
| Lots | /admin/items | Search and filter every lot. Create and edit lots, change their status, and manage the gallery (upload images or add them by URL, remove images). |
| Invoices | /admin/invoices | Filter by unpaid, paid, void or refunded. Mark paid (offline payment), Void an unpaid invoice, Refund a paid one. |
| Bidders | /admin/bidders | Approve, suspend or reset a bidder to pending. Set a maximum bid limit for each bidder. |
| Enquiries | /admin/enquiries | Lot questions, condition-report requests, absentee and telephone bids, and contact messages. Filter by status and type. Mark handled or reopen. |
| Consignments | /admin/consignments | "Sell with us" requests. Set status to new, reviewing or closed. |
| Reports | /admin/reports | Invoice totals by status and by currency, and results for each sale. Export invoices CSV and Export results CSV. |
| Audit log | /admin/audit | A read-only record of every admin action: who did it, when and from where. Click an action to filter by it. |
| Users & admins | /admin/users | Everyone with an account. Promote a user to admin or demote to bidder. Create a new admin. |
| Settings | /admin/settings | Site name, currency, tagline, footer and newsletter text, contact details, social links, bidding rules, notifications, tax rate and shipping note. |
Once an event or lot is scheduled or live, the fields that affect bidding are locked, so nobody's bid changes meaning mid-sale. The slug and currency lock once it is scheduled. While it is live or paused, only presentation fields (title, description, images, category, featured) can be edited. Ended and withdrawn sales cannot be edited at all. Events and lots can only be deleted when they are draft, ended or withdrawn. An event must have no lots left, and a lot must have no bids.
07 Customising
You can change most things by editing plain text files. No coding needed. This section starts with the easiest changes.
Before you edit
- Restart after editing JSON. The demo data is loaded once when the server starts. After you save a file in
src/mock-api/data/, stoppnpm dev(Ctrl+C) and start it again. - Keep the JSON valid. Use double quotes, put commas between items and no comma after the last one. If the site breaks after an edit, paste the file into a JSON validator. VS Code also underlines mistakes in red.
- Money is text. Write prices as strings, like
"1500"or"1500.50". Use digits only, with no currency sign and no thousands separator. You can use up to 4 decimals. - Dates use the ISO format with a time zone, like
"2026-10-15T12:00:00.000Z"(theZmeans UTC). - Admin vs. JSON. On your real site you never edit these JSON files: everything below is edited in the admin area (Admin → Settings and Admin → Content) and saved in the database for good. The JSON files only feed demo mode, where admin changes last until the server restarts.
Site name, contact details & social links
File: src/mock-api/data/settings.json (the same fields as Admin → Settings).
| Field | Used for |
|---|---|
siteName | Logo alt text, browser tab titles ("Page · Site name"), social cards, cookie banner, admin sidebar. |
siteTagline | Shown after the site name in the default page title and in search results. |
currencyCode | Default currency, for example "USD". |
footerBlurb, newsletterBlurb | Footer text and the note above the newsletter box. The footer blurb is also the site's meta description. |
contactEmail, contactPhone, contactAddress | Shown on the Contact page. |
socialInstagram, socialFacebook, socialX, socialLinkedin | Footer social links. Leave one empty ("") to hide it. |
shippingInfo | The "Shipping & collection" paragraph on every lot page. Empty = hidden. |
biddingEnabled | false switches off all bidding (a global kill-switch). |
showBidderNames | false shows masked labels such as "Bidder 3FA2C" in bid histories. true shows real names. |
requireBidderApproval | true means new bidders must be approved by an admin before they can bid. |
antiSnipeTriggerSeconds, antiSnipeExtendSeconds | Anti-sniping (see section 8). Demo: 300 and 120. Set either to 0 to turn it off. |
notifyWinner, notifyOutbid, notifyWatchBid | Which notifications are sent. |
watchEndingSoonSeconds | How long before the close watchers get an "ending soon" notice. 0 = off. |
taxRatePercent | Tax / VAT added to invoices, as text, for example "20". |
The sign-in and register screens contain the brand name as fixed text: "Sign in to Auctionyx" (src/app/login/page.tsx), "Join Auctionyx" (src/app/register/page.tsx) and "New to Auctionyx?" (src/components/auth-form.tsx). The demo text in home.json and pages.json also uses it. Use your editor's Find in folder for Auctionyx and replace it where you want your own name.
Menus & currencies
Real site: Admin → Content → Menus & currencies. Demo data: src/mock-api/data/site.json. Both use the same structure:
"header": [
  { "label": "Home", "href": "/" },
  { "label": "Auctions", "href": "/events" }
]navigation.header: the top menu.navigation.footer: footer columns. Each has atitleand a list oflinks.navigation.legal: the small links at the very bottom. The cookie banner links to the first legal link whose address contains "cookie".displayCurrencies,fxBaseCurrency,fxRates: the currency switcher. Rates are how much 1 unit of the base currency is worth in each currency. They are only a guide, so update them from time to time.
Homepage sections
Real site: Admin → Content → Homepage. Demo data: src/mock-api/data/home.json. The homepage shows these sections from top to bottom. Change the text, links and images. The layout stays the same.
| Key | Section | What to edit |
|---|---|---|
seo | (not visible) | The homepage's browser title and search description. |
hero | Hero | badge, title + titleHighlight (shown in gradient), subtitle, search searchPlaceholder, two buttons (primaryCta, secondaryCta), imageUrl + imageAlt, and three highlights (value + label). |
liveEvents | Live & upcoming auctions | Heading text, link, and limit: how many to show (live ones first). |
categories | Categories | Tiles: label, imageUrl, href (for example /auctions?category=cars), countLabel, featured (makes a tile larger). |
howItWorks | How it works | Steps with number, title, body. The hero's "How it works" button jumps here via #how. |
featuredLots | Featured lots | Heading, link, limit. Shows lots marked isFeatured. If none are featured, it shows standalone lots instead. |
trust | Trust / stats | stats (value + label) and features (title + body). |
testimonials | Testimonials | items with initials, quote and the person's details. |
cta | Closing banner | title, body and two buttons. |
The category href must match the category value used on your lots. The link /auctions?category=cars lists lots whose category is "cars".
Legal & static pages
Real site: Admin → Content lists every page. Click Edit, change the text and save. Write ## at the start of a line for a heading, - for a bullet point, and leave an empty line between paragraphs. New page creates a page such as "About us" at /pages/about-us; add it to a menu so visitors can find it.
Demo data: src/mock-api/data/pages.json. Each page is written as a list of simple "blocks":
{
  "slug": "privacy",
  "title": "Privacy Policy",
  "summary": "One-sentence intro shown under the title and used as the page description.",
  "updatedAt": "2026-08-28T12:00:00.000Z",
  "blocks": [
    { "type": "heading",   "text": "1. What we collect" },
    { "type": "paragraph", "text": "Plain text paragraph." },
    { "type": "list",      "items": ["First point", "Second point"] }
  ]
}- The three block types are
heading,paragraphandlist. Text is plain text, not HTML. - A page is shown at
/legal/<slug>. To add a page, add a new entry with a newslug, then add a link to it insite.jsonundernavigation.legal(orfooter). - The entries with slug
sellandcontacthold the intro text of the/selland/contactpages.
The Conditions of Sale, Privacy, Cookie and Shipping pages are placeholder examples, not legal advice. Have your own terms written or checked for your country before you take real bids.
Auctions (events) & lots
An event is a sale, such as "Classic Motor Car Auction". A lot is one item for sale. A lot either belongs to an event (eventId = the event's id) or stands alone (eventId: null). The demo has 6 events and 46 lots. Six of the lots are standalone.
Event fields: events.json
| Field | Example | Meaning |
|---|---|---|
id | 1 | Unique number. Lots point to it with eventId. |
slug | "classic-cars" | The web address: /events/classic-cars. Lowercase letters, numbers and hyphens. Must be unique. |
title, description | text | Name and intro text. |
status | "active" | draft, scheduled, active, paused, ended or cancelled (see section 8). |
visibility | "public" | "private" hides the event from the public site. |
isFeatured | true | Marks the event as featured. |
category | "cars" | Category key. |
timezone | "UTC" | The sale's time zone as an IANA name, e.g. "Europe/London" or "America/New_York". Bidders see the sale's times in this zone, with the zone shown (e.g. "5:00 PM BST"). Date fields in the admin are always entered in UTC and labelled "(UTC)". |
startAt, endAt | ISO date | When bidding opens and closes. These times apply to every lot in the event. |
currencyCode | "USD" | Three-letter currency code for the sale. |
buyersPremiumPercent | "12" | Buyer's premium in percent, as text. |
defaultOpeningPrice, defaultMinIncrement, defaultReservePrice | null | Default prices for the sale. When you create a lot in this sale and leave its minimum increment or reserve empty, the event's default increment / default reserve is used. The opening price is always entered per lot. |
bannerImageUrl | "/images/events/x.webp" | Banner picture. |
createdAt, updatedAt, deletedAt | ISO date / null | Record-keeping. Keep deletedAt as null. |
Lot fields: lots.json
| Field | Example | Meaning |
|---|---|---|
id | 1 | Unique number. |
eventId | 1 or null | The event it belongs to, or null for a standalone lot. |
slug | "rolex-submariner" | Web address: /auctions/rolex-submariner. Unique. |
title, description | text | Name and main text. |
provenance, conditionReport | text or null | Extra sections on the lot page. null hides them. |
category | "watches" | Category key used by the catalogue filter. |
sku, lotNumber | "IND-01", "I01" | Your stock code, and the lot number shown as "Lot I01". |
status | "active" | Same six statuses as events. |
isFeatured | true | Show in the homepage "Featured lots" section. |
currencyCode | "USD" | Currency the lot is sold in. |
openingPrice | "9000" | The first bid must be at least this. |
minimumIncrement | "250" | Each new bid must beat the current one by at least this. |
reservePrice | "11000" or null | Secret lowest selling price. Never shown to the public. Visitors only see "Reserve: met / not yet met". |
estimateLow, estimateHigh | "12000", "16000" | The estimate shown on the lot page. |
currentHighestBid, bidCount | "12500.0000", 9 | Summary of the lot's bids in bids.json. For a lot with no bids, use null and 0. |
startAt, endAt | ISO date | Bidding window for standalone lots. For lots inside an event, the event's times are used. |
bannerImageUrl | "/images/lots/x.webp" | Main image. Used for cards, and as the gallery if the lot has no gallery images. |
winnerUserId, winnerBidId | null | Filled in automatically when the lot closes. Keep null for new lots. |
sortOrder | 1 | Order of lots inside an event (lower first). |
createdAt, updatedAt, deletedAt | ISO date / null | Record-keeping. Keep deletedAt as null. |
Lot gallery: lot-images.json
{ "id": 1, "lotId": 1, "url": "/images/lots/rolex-front.webp", "alt": "Front of the watch", "sortOrder": 0 }Add one entry per picture. lotId is the lot's id, and sortOrder sets the order (0 comes first). Always write a short alt text for screen readers.
Dates in the demo (the "time shift")
The demo dates are written as if today were the anchor date in meta.json (27 September 2026). When the server starts, every date is moved forward by the time since that anchor. This keeps live auctions live and "ending soon" lots ending soon, whenever you run the demo. Write your dates relative to the anchor. To use your dates exactly as written, set MOCK_TIME_SHIFT=off in .env.local.
Starting with an empty catalogue
- Replace the contents of
events.json,lots.jsonandlot-images.jsonwith your own entries. - Empty the demo records that point to the old lots: set
bids.json,watchlist.json,notifications.json,invoices.json,enquiries.jsonandaudit-log.jsonto[]. - On every lot, set
currentHighestBidtonull,bidCountto0and both winner fields tonull. - Restart
pnpm dev.
Editing JSON is fine for trying the template and for demos. For a real, running auction business you manage lots from the admin panel with a real backend connected (section 9).
Colours & fonts
File: src/app/globals.css. All colours are defined as "design tokens" at the top, inside @theme { … }:
@theme {
  --color-brand:   #2563eb;  /* main brand colour (links, buttons, highlights) */
  --color-brand-2: #7c3aed;  /* second brand colour (gradient end)            */
  --color-base:    #ffffff;  /* page background                               */
  --color-surface: #f7f8fa;  /* card / panel background                       */
  --color-ink:     #0e1320;  /* main text                                     */
  --color-success: #16a34a;  --color-warning: #d97706;  --color-danger: #dc2626;
  --font-sans:    'Inter', …;   /* body text  */
  --font-display: 'Sora', …;    /* headings   */
  --radius-md: 14px;            /* corner roundness */
}- Change
--color-brandand--color-brand-2to your colours. - The gradient is also written out directly in a few places. Search the
srcfolder for#2563eband#7c3aedand replace them too: inglobals.css(the gradient buttons and gradient text), insrc/components/home-sections.tsx(the closing banner) and insrc/app/global-error.tsx. The soft glow behind the homepage hero uses the same colours written asrgba(37,99,235,…)andrgba(124,58,237,…)inhome-sections.tsx. - Save.
pnpm devreloads the page automatically.
Changing the fonts
- Put your font files (
.woff2) inpublic/fonts/. - In
globals.css, edit the two@font-faceblocks at the top: set thefont-familyname and thesrc: url('/fonts/your-file.woff2'). - Update
--font-sans(body) and--font-display(headings) to the new names.
The fonts are stored in the template, so no font is loaded from Google or any other server.
Dark mode
Visitors choose System, Light or Dark with the switch in the header. The choice is remembered in their browser. The dark colours are in globals.css, right after @theme. They appear twice, and you must keep both copies the same:
:root[data-theme='dark'] { … }is used when the visitor picks Dark.@media (prefers-color-scheme: dark) { :root:not([data-theme='light']) { … } }is used when the visitor picks System and their device is in dark mode.
Logo & favicon
Folder: public/brand/. The simplest way is to replace these files with your own and keep the same file names:
| File | Used for | Tip |
|---|---|---|
logo-light.webp | Logo on light backgrounds (light mode) | Dark-coloured logo. Designed at 250 × 52 px. Keep a similar wide shape. |
logo-dark.webp | Logo on dark backgrounds (dark mode) | Light-coloured version of the same logo, same size. |
favicon-512.png | Browser tab icon | Square, 512 × 512 px PNG. |
apple-touch-icon.png | Icon when saved to an iPhone/iPad home screen | Square, 180 × 180 px PNG. |
favicon.ico, logo-mark.svg | Extra icon files | Replace them too so no old brand file is left behind. |
Browsers keep favicons in their cache for a long time. If you still see the old icon, do a hard refresh (Ctrl+F5 / Cmd+Shift+R) or open a private window.
Images
- Put pictures in
public/images/. The demo useshero.webp,categories/,events/andlots/. - A file at
public/images/lots/my-lot.webpis written as"/images/lots/my-lot.webp"in the JSON. Start with/and leave out the wordpublic. - You can also use a full web address (
https://…) for pictures stored elsewhere. - Use JPG or WebP, around 1600 px wide for lot photos, and compress them. Big files make pages slow.
- In the admin panel you can also upload lot images (JPG, PNG, WebP, AVIF or GIF, up to 8 MB each). In demo mode they are kept in memory only. With a real backend, your backend stores them.
- The demo photos come with licences that need attribution (see Credits). If you keep any demo photo on a live site, keep its credit. Replacing them with your own photos is best.
08 How auctions work
The life of an event or lot
Events and lots move through the same six statuses:
| Status | Shown on the site as | Meaning | Can move to |
|---|---|---|---|
draft | (hidden) | Being prepared. Not public. | scheduled, active, cancelled |
scheduled | Upcoming | Public, but bidding hasn't opened. | draft, active, cancelled |
active | Live | Open for bids. | paused, ended, cancelled |
paused | Paused (listed under Live) | Bidding temporarily stopped. | active, ended, cancelled |
ended | Ended | Closed. The winner has been worked out. Final. | (none) |
cancelled | (hidden; "Withdrawn" in admin) | Called off. Final. | (none) |
In demo mode, time-based changes happen by themselves. A scheduled sale opens when its start time arrives, and a live sale ends at its end time. A lot inside an event can only be live while its event is live.
Placing a bid and the minimum increment
The first bid must be at least the opening price. After that, each bid must be at least current bid + minimum increment. Example: the current bid is $12,500 and the increment is $250, so the next bid must be $12,750 or more. The bidding panel always shows this "next minimum bid".
Proxy (maximum) bidding
Instead of coming back to bid again and again, a bidder can enter a secret maximum. The system then bids for them, raising the price by just enough to stay ahead, up to their maximum. Nobody else sees the maximum.
- Anna bids $1,000 with a maximum of $1,500. The price is $1,000, and Anna leads.
- Ben bids $1,200. Anna's maximum is higher, so the system bids for her at $1,300 (Ben's $1,200 + $100). Anna still leads, and Ben is told he was outbid.
- Ben sets a maximum of $2,000. It beats Anna's $1,500, so the price becomes $1,600 (Anna's maximum + $100). Ben now leads.
If two bidders set the same maximum, the one who got there first wins. Raising your own maximum while you are leading does not push the price up against yourself.
Reserve price
The reserve is the secret lowest price the seller will accept. Visitors only see "Reserve: not yet met", "met" or "not met". As soon as a bidder's maximum reaches the reserve, the price rises to the reserve. If bidding ends below the reserve, the lot does not sell: there is no winner and no invoice.
Anti-sniping (extra time)
"Sniping" means bidding in the last seconds so nobody can answer. To keep sales fair, a bid placed in the final trigger window pushes the closing time to now + extend. With the demo settings (300 and 120 seconds), a bid in the last 5 minutes means the sale closes 2 minutes after that bid. The close is never made shorter. For a lot inside an event, the whole event's closing time is extended. Change the values in Admin → Settings → Bidding, or set either to 0 to turn anti-sniping off.
Who can bid
- Visitors must sign in first.
- Suspended bidders can never bid. Pending bidders can bid only while "Require bidder approval" is off.
- An admin can set a maximum bid limit for each bidder in Admin → Bidders.
- "Bidding enabled" in Settings switches all bidding off at once.
- To stop abuse, each bidder can place at most 10 bids in 10 seconds.
Buyer's premium, tax and invoices
When a lot ends with a winner (and the reserve is met), one invoice is created for the winner:
| Line | How it is calculated | Example |
|---|---|---|
| Hammer price | The winning bid | $10,000.00 |
| Buyer's premium | Hammer × the event's buyersPremiumPercent | 12% → $1,200.00 |
| Tax / VAT | (Hammer + premium) × taxRatePercent from Settings | 0% → $0.00 |
| Total | Hammer + premium + tax | $11,200.00 |
The winner gets a "You won" notification and finds the invoice under Account → Invoices. Admins manage invoices under Admin → Invoices: Unpaid → Paid (or Void), and Paid → Refunded. The maths uses whole numbers internally, so there are no rounding errors.
Notifications
Bidders get in-site notifications when they are outbid, when they win, when someone bids on a lot they watch, and when a watched lot is ending soon. Each type can be switched off in Settings. On your real site each notification is also sent by e-mail once e-mail is set up (section 9.2). The demo does not send e-mail.
09 Run your real auction site
The built-in backend is the stock room and till behind the shop window: it stores accounts, auctions and bids in a PostgreSQL database, applies the bidding rules, closes each sale at its end time, picks the winner, creates the invoice and e-mails people. You switch it on with one setting.
1. Set up the database
- Get a PostgreSQL database. Easiest: create a free project at Neon (neon.tech) or Supabase (supabase.com) and copy the connection string they show you. It looks like
postgres://user:password@host/dbname. (Developers can also usedocker compose up -dwith the includeddocker-compose.yml.) - Put it in your settings file. Copy
.env.exampleto.env.localand set:DATABASE_URL=postgres://user:password@host/dbname APP_URL=http://localhost:3000 - Create the tables and starter content (menus, homepage text, legal pages):
pnpm db:setup - Create your admin account:
Run the same command again at any time to reset a forgotten admin password.pnpm admin:create --email you@example.com --password "a-long-password" --name "Your Name" - Start the site with
pnpm dev, sign in at/login, and open Admin. Fill in Settings (site name, contact e-mail, currency, tax) and Content (your legal pages, homepage and menus), then create your first event and lots.
pnpm db:demo fills the database with the demo auctions and demo accounts. It deletes everything in that database first, so only use it on a practice database. It refuses to run once real accounts exist.
Finished practising? Run pnpm db:reset --force to delete everything (the demo accounts too — they use the public password demo1234) and put the starter content back, then pnpm admin:create again.
2. E-mail
Your site sends sign-up confirmations, password-reset links, "you won" / "you were outbid" messages, and tells you (at the contact e-mail in Settings) about new enquiries. Set one of these:
SMTP_URL=smtps://user:password@smtp.your-provider.com:465
# or
RESEND_API_KEY=re_...

MAIL_FROM=Your Auction House <no-reply@your-domain.com>
Any e-mail provider with SMTP works (your host's mail server, Gmail, Brevo, Mailgun, Amazon SES…). Without it, e-mails are only printed in the terminal, which is fine for testing but not for a live site.
3. Card payments (optional)
To let winners pay invoices by card, create a Stripe account and set STRIPE_SECRET_KEY. In Stripe, add a webhook to https://your-domain.com/api/webhooks/stripe for the event checkout.session.completed and put its signing secret in STRIPE_WEBHOOK_SECRET. Invoices then get a Pay now button and are marked paid automatically. Without Stripe, buyers pay you another way (for example bank transfer) and you click Mark paid in Admin → Invoices.
4. Image storage
Photos you upload in the admin are saved in the storage/uploads folder on your server. That is fine on your own server (include the folder in your backups). On Vercel or Netlify the disk is wiped all the time, so there you must use cloud storage such as Cloudflare R2, Amazon S3 or DigitalOcean Spaces: set S3_BUCKET, S3_REGION, S3_ACCESS_KEY_ID, S3_SECRET_ACCESS_KEY and S3_PUBLIC_BASE_URL (plus S3_ENDPOINT for R2 or Spaces).
5. Closing sales on time
Sales open and close by themselves while people are browsing. To make sure they also close (and winners get their e-mail) in the middle of the night, set a secret CRON_SECRET (any long random text) and have a scheduler call this address every minute:
curl -fsS -H "Authorization: Bearer YOUR_CRON_SECRET" https://your-domain.com/api/cron/tickOn your own server use crontab; elsewhere a free service such as cron-job.org works. Running it twice by accident is harmless.
6. Go-live checklist
- A production PostgreSQL database in
DATABASE_URL(on Vercel/Netlify: the provider's pooled connection string andDATABASE_POOL_SIZE=1). APP_URLset to your realhttps://address.pnpm db:setupandpnpm admin:createrun against that database.- E-mail working (try "Forgot password" with your own address).
- Image storage set up (cloud storage on Vercel/Netlify).
- The every-minute call to
/api/cron/tickin place. - Your own Settings, legal pages, homepage, logo and photos — and no demo data (
pnpm db:reset --forceremoves it). If you keep the starter photos, keep a link to their credits (public/images/CREDITS.md) — their licences require it. - Decide whether bidders must confirm their e-mail before bidding: Admin → Settings → "Require a confirmed e-mail address" (on by default).
- Admin → Dashboard shows no Before you go live panel — it lists anything above that is still missing.
- Daily database backups (managed databases usually do this for you — check).
- After every template update:
pnpm install,pnpm db:migrate,pnpm build, restart.
The full technical guide is docs/developer/BACKEND.md in your download.
7. Using your own backend instead
If you already run another system (Laravel, Django, WordPress…), a developer can connect it instead of the built-in backend. It must answer the documented API; then set API_BASE_URL=https://api.your-domain.com/v1 (it takes priority over DATABASE_URL). See docs/developer/CONNECT-YOUR-BACKEND.md in your download and docs/developer/API-CONTRACT.md in your download.
Set API_MODE=mock to force the demo data (for a public demo copy). A production server needs API_MODE=mock to show demo data at all.
10 Deployment
The mock API is demo data held in the server's memory. The demo logins (admin@demo.test / demo1234 and the others) are public, and anything visitors enter (names, e-mail addresses, bids, enquiries, uploads) is visible to anyone who signs in as the demo admin. Everything resets on every restart or redeploy, and on "serverless" hosts like Vercel and Netlify, different visitors can even be served by different copies with different data.
Before launch, set DATABASE_URL to your production database (section 9), or API_BASE_URL to your own backend. If you forget, the site shows a "We'll be right back" page instead of the demo, so the public demo logins never reach a live site. If you deploy only as a demo on purpose, set API_MODE=mock and set MOCK_AUTH_SECRET to a long random value (for example the output of openssl rand -base64 32).
Whichever host you use, set at least these environment variables: APP_URL (your site's address), DATABASE_URL, the e-mail settings and CRON_SECRET. On Vercel and Netlify also set the S3_… image-storage settings (section 9.4). Run pnpm db:setup and pnpm admin:create once against the production database. For a public demo, instead leave API_BASE_URL empty and set API_MODE=mock plus MOCK_AUTH_SECRET (a long random string).
Vercel (recommended for Next.js)
- Create a free account at vercel.com.
- Put the project in a private Git repository (GitHub, GitLab or Bitbucket). Don't upload
node_modules,.nextor.env.local. The included.gitignorealready leaves them out. - In Vercel click Add New → Project and import the repository. Vercel detects Next.js and pnpm by itself. Keep the default build settings.
- Open Environment Variables and add
APP_URL,DATABASE_URL(the pooled connection string),DATABASE_POOL_SIZE=1, the e-mail,CRON_SECRETandS3_…settings, and any others you need. - Click Deploy. After a minute or two you get an address like
your-project.vercel.app. - Add your own domain under Settings → Domains, then update
APP_URLto it and redeploy.
Netlify
- Push the project to a private Git repository (as above).
- In Netlify choose Add new site → Import an existing project and pick the repository. Netlify detects Next.js by itself.
- Build command:
pnpm build. Leave the publish directory as Netlify suggests. - Under Site configuration → Environment variables add
APP_URL,DATABASE_URL, the e-mail,CRON_SECRETandS3_…settings, and any others. SetNODE_VERSIONto20(or newer) if the build uses an older Node. - Deploy, then connect your domain.
Your own server (VPS)
Any Linux server with Node.js 20+ works.
- Upload the project (or
git cloneit), then in the project folder run:corepack enable pnpm install --frozen-lockfile cp .env.example .env.local # then edit .env.local pnpm build - Start it and keep it running with a process manager such as PM2:
The site now listens on port 3000. Usenpm install -g pm2 pm2 start "pnpm start" --name auctionyx pm2 savepnpm start -p 8080for another port. - Put a web server such as Nginx or Caddy in front of it, and serve the site over HTTPS. In production the sign-in cookie is marked "secure", so sign-in only works over
https://. - Install PostgreSQL on the server (or use a managed one), set
DATABASE_URL, runpnpm db:setupandpnpm admin:create, and add the every-minutecrontabline from section 9.5. - After every update: pull the new files, then run
pnpm install,pnpm db:migrate,pnpm buildandpm2 restart auctionyx.
Shared hosting that only runs PHP cannot run Next.js. You need a host that runs Node.js.
11 Environment variables
Put these in .env.local for your computer, or in your host's environment settings. For the demo none are needed; for your real site you need at least DATABASE_URL, APP_URL, the e-mail settings and CRON_SECRET. Restart or redeploy after changing them. The complete list with explanations is in .env.example.
| Variable | Default | What it does |
|---|---|---|
DATABASE_URL | (empty) | Your real site. The PostgreSQL connection string. Set = the built-in backend runs your site from this database. Empty = demo data. |
SMTP_URL or RESEND_API_KEY, MAIL_FROM | (empty) | How e-mails are sent, and from which address (9.2). |
CRON_SECRET | (empty) | Protects the every-minute address that closes sales on time (9.5). |
STRIPE_SECRET_KEY, STRIPE_WEBHOOK_SECRET | (empty) | Card payments for invoices (9.3). |
S3_BUCKET, S3_REGION, S3_ACCESS_KEY_ID, S3_SECRET_ACCESS_KEY, S3_PUBLIC_BASE_URL, S3_ENDPOINT | (empty) | Cloud storage for uploaded images (9.4). Empty = the storage/uploads folder (UPLOAD_DIR). |
DATABASE_POOL_SIZE, DATABASE_PREPARE | 10, on | Database connections per server. On Vercel/Netlify use 1; with a "transaction" connection pooler set DATABASE_PREPARE=off. |
TRUSTED_PROXY_HOPS, CLIENT_IP_HEADER | 1, (empty) | How the visitor's IP address is found behind your host or proxy (used by the anti-abuse limits). The defaults suit Vercel, Netlify and one Nginx proxy; on Cloudflare set CLIENT_IP_HEADER=cf-connecting-ip. |
API_BASE_URL | (empty) | Only if you use your own backend instead of the built-in one, for example https://api.example.com/v1. |
API_MODE | (empty) | mock forces demo data even when DATABASE_URL or API_BASE_URL is set. Required for demo data on a production server (pnpm start); pnpm start:demo sets it for you. |
API_TIMEOUT_MS | 10000 | Give up on a backend request after this many milliseconds. |
API_CONTENT_REVALIDATE_SECONDS | 60 | How long site settings, homepage text and pages are cached when using a real backend. Live auction data is never cached. |
APP_URL | http://localhost:3000 | Your site's public address, without a slash at the end. Used for SEO links, the sitemap and social cards. Set this in production. |
NEXT_PUBLIC_LIVE_POLL_SECONDS | 5 | How often an open lot page refreshes the price and bid history (1–60 seconds). Because it starts with NEXT_PUBLIC_, it is built into the site, so rebuild after changing it. |
MOCK_AUTH_SECRET | (empty) | Demo mode only: the secret used to sign demo logins. Empty on a production server = a random key, so everyone is signed out on restart. Set it on any public demo. Generate one with openssl rand -base64 32. |
MOCK_TIME_SHIFT | (empty) | Demo mode only: off uses the dates in the JSON exactly as written, with no shift to "now". |
MOCK_DEMO_LOCK | (empty) | Demo mode only. Protects a public live demo: the demo accounts cannot change password, two-factor, profile, role or status, and site settings cannot be saved (visitors see "This change is disabled on the public demo"). On by default for a production build (pnpm start:demo), off during pnpm dev. Set on or off to override. |
MOCK_RESET_HOURS | (empty) | Demo mode only. Resets the demo data to the JSON files every N hours (default 6 after pnpm build, never during pnpm dev). 0 = never. |
MOCK_UPLOAD_LIMIT_MB | 64 | Demo mode only. Total memory the demo may use for uploaded images. When it is full, the oldest uploads are dropped first. |
Never put passwords or secret keys in variables starting with NEXT_PUBLIC_. Those values are visible to every visitor.
12 FAQ & troubleshooting
"pnpm: command not found" / "pnpm is not recognized"
Run corepack enable and open a new terminal. If that doesn't help, run npm install -g pnpm. On Windows, also see the PowerShell note in Windows notes.
Install fails or shows "Unsupported engine"
Your Node.js is older than version 20. Install the current LTS from nodejs.org, check with node -v, delete the node_modules folder and run pnpm install again.
"Port 3000 is already in use"
Another program (often a second copy of the site) is using that port. Close it, or start on another port with pnpm dev --port 3001 and open http://localhost:3001.
I edited a JSON file but nothing changed
Demo data is loaded once when the server starts. Stop pnpm dev with Ctrl+C and start it again. If the site shows an error instead, the JSON probably has a typo, such as a missing comma or an extra comma after the last item.
My bids, sign-ups or admin changes disappeared
That is expected in demo mode. Everything is kept in memory and resets when the server restarts. Set up the database to keep data (section 9).
All the auctions show as ended (or dates look wrong)
Check that MOCK_TIME_SHIFT is not set to off. With the shift on, demo dates always follow today's date. Restart the server if it has been running for many days, because the shift is calculated at start-up.
I can't bid on a lot
Check that you are signed in, the lot is Live (not upcoming, paused or ended) and your amount is at least the "next minimum bid". Also check that bidding is enabled in Settings, your account isn't suspended (or pending while approval is required), and the bid isn't above your bid limit. The bidding panel shows the exact reason.
Where is the e-mail verification / password reset e-mail?
In demo mode, and on a real site before e-mail is set up, no e-mail is sent: the link is printed in the terminal running the site. Open that address in your browser. To send real e-mails, set SMTP_URL or RESEND_API_KEY and MAIL_FROM (section 9.2).
Sign-in works locally but not on my server
In production the sign-in cookie only works over HTTPS. Serve the site at https:// (see own server) and set APP_URL to that address.
I changed the brand colour but buttons still show blue→purple
The gradient is also written out as fixed colour codes. Search for #2563eb and #7c3aed in src and replace them (see Colours & fonts).
Can I change the page layouts?
Yes. Pages are in src/app/ (one folder per address) and reusable parts are in src/components/. They are React components styled with Tailwind CSS classes. Basic React knowledge helps. Changing layouts is customisation work, which is not covered by support (see below).
Does it take payments?
Yes, by card through Stripe, once you add your Stripe keys (section 9.3). Without Stripe, buyers pay you another way and you mark invoices paid in the admin. In demo mode, Pay simply marks the invoice as paid.
Is there a database inside? Do I need WordPress?
This edition includes the backend and uses a PostgreSQL database that you provide (a free managed one is fine). No WordPress or PHP is involved; you need a host that runs Node.js.
"relation does not exist" or the site cannot load after an update
The database tables are older than the code. Run pnpm db:migrate (with DATABASE_URL pointing at that database) and restart.
Uploaded images disappear or show "not found" on Vercel/Netlify
Those hosts do not keep files on disk. Set up cloud storage (section 9.4) and upload the images again.
Sales did not close overnight / winners got their e-mail late
Sales close by themselves while people browse. For exact closing when nobody is on the site, add the every-minute call to /api/cron/tick (section 9.5).
I am locked out of the admin
On the server (or your computer, with DATABASE_URL pointing at the live database) run pnpm admin:create --email you@example.com --password "a-new-long-password". It resets the password of that account and makes it an admin.
13 Support
We are happy to help you get Auctionyx running.
Included in support
Help installing and using the template as shipped, as described in this guide. Answers to questions about the template's features and the included files. Fixes for bugs in the template's own code.
Not included
Custom development: customisation, new features or changed layouts. Third-party backends, including building or fixing the backend you connect. Hosting and server set-up. Problems caused by third-party code or by changes to the template's code. Custom work can sometimes be arranged separately, so just ask.
How to contact us
- Check this guide and the FAQ first. Many answers are already here.
- E-mail waafaaofficial@gmail.com.
- Include your order number or the e-mail address you used at checkout, your Node.js version (
node -v), your operating system, what you did, what you expected, and the full error message or a screenshot.
Response time: within 1–2 business days, Monday to Friday, Bangladesh time (GMT+6).
Support period and refunds: these follow the terms on the Auctionyx product page at waafaa.com, where you bought the template.
Seller: WaaFaa. Available at waafaa.com.
14 Credits
Fonts
| Font | Used for | Licence | File |
|---|---|---|---|
| Sora | Headings | SIL Open Font License 1.1 | public/fonts/sora-variable.woff2 |
| Inter (by Rasmus Andersson) | Body text | SIL Open Font License 1.1 | public/fonts/inter-variable.woff2 |
Both fonts are free to use, including commercially, and are included in the template.
Images
The demo event and lot photos come from Wikimedia Commons under redistributable licences (Public Domain, CC0, CC BY and CC BY-SA). The full list with authors, licences and source links is in public/images/CREDITS.md. They are for the demo only and are not part of what you are licensed to resell. If you keep any CC BY or CC BY-SA image on your site, keep its credit.
Software
Built with Next.js, React, Tailwind CSS, TypeScript and Zod. All are open-source under the MIT licence (TypeScript: Apache 2.0).
15 Changelog
Full-stack edition (29 September 2026)
- Built-in backend on PostgreSQL: accounts with secure sessions, e-mail verification and password reset, two-factor sign-in, and limits against password guessing and spam.
- Real bidding: each bid is processed safely one at a time per lot, a double-click never places two bids, proxy bids, reserve, anti-sniping.
- Sales open and close on time (automatically and with an every-minute cron), reserve-aware winners, one invoice per won lot.
- E-mail (SMTP or Resend), Stripe card payments with automatic refunds of duplicate payments, image uploads to disk or S3-compatible storage.
- New Admin → Content: edit legal pages, create new pages, and edit the homepage and menus without touching files. Newsletter subscribers export.
- Setup commands:
pnpm db:setup,pnpm admin:create,pnpm db:demo,pnpm db:reset --force,pnpm db:migrate.
Version 1.0.0 (27 September 2026)
- Initial release.
- Public site: home, auctions, auction pages, catalogue with search, filters, sort and pagination, lot pages with live bidding, sell, contact and legal pages.
- Bidding: minimum increment, proxy (maximum) bids, hidden reserve, anti-sniping, bid history, watchlist and lot enquiries.
- Accounts: register, sign in, e-mail verification, password reset, two-factor authentication, dashboard, bids, watchlist, notifications and invoices.
- Admin: dashboard, events, lots and galleries, bidders, users, invoices, enquiries, consignments, audit log, reports with CSV export, and settings.
- Built-in mock API with demo data and automatic date shifting. Connect your own backend with one setting.
- Light, dark and system themes, and a display-currency switcher.